Stripe is known for its user-friendly interface and comprehensive developer documentation, making it a popular choice for businesses looking to implement a payment system on their website or application. In addition to its payment processing capabilities, Stripe also offers a range of financial and business tools, such as a virtual terminal and a business account, to help businesses manage their finances and grow.
Let’s get started with the Stripe Integration in Laravel. You can check out my other article to integrate the stripe using PHP.
In this tutorial i will cover everything you need to know to integrate the stripe with Laravel. By the end of this tutorials you will be able to integrate and test Stripe in your Laravel application.
Laravel Setup/Installation
You can skip this step if you already have Laravel installed. In case you don’t have Laravel installed then let’s do it first. Use the following command to evoke a Laravel installtion.
composer create-project laravel/laravel laravel-stripe-exampleYou should be able to see something like this by the end of the installation. If you run into issues please refer to the Laravel Documentation. As the installation is complete you will see something like this in your terminal.
Stripe PHP Library for Payment Integration
We are ready at this point to install the Stripe PHP Library. Use the following in Laravel directory to install this package.
composer require stripe/stripe-phpLoading composer repositories with package information
Updating dependencies
Lock file operations: 1 install, 0 updates, 0 removals
- Locking stripe/stripe-php (v10.2.0)
Writing lock file
Installing dependencies from lock file (including require-dev)
Package operations: 1 install, 0 updates, 0 removals
- Downloading stripe/stripe-php (v10.2.0)
- Installing stripe/stripe-php (v10.2.0): Extracting archive
Generating autoload files
No security vulnerability advisories foundIf you something like the above out output we should be good to move to the next step.
Stripe API Keys
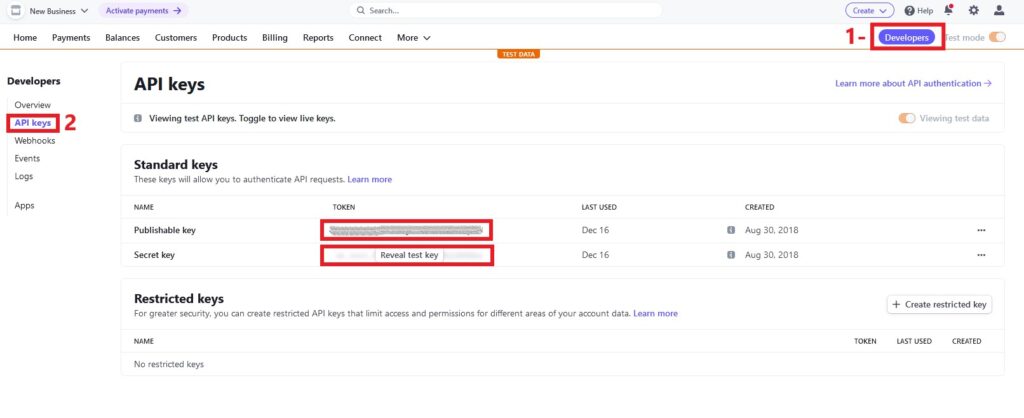
You will need a Stripe account to complete this step. Once you sign up you can obtain the API Keys from Stripe by following these steps.
- Click the Developer button in top right corner.
- Click the API Keys in the left sidebar.
- Get the Publishable Key and Secret Key
Now we need to add these keys into the .env file of Laravel. Open .env file and add your keys in it.
Do remember to replace the “<…>” with your keys.
STRIPE_PUBLISH_KEY=<Your Publishable Key>
STRIPE_SECRET_KEY=<Your Secret Key>
Payment Controller for Stripe Integration
Our next step is to create a controller to initiate the payment from Stripe. You can use the following command in Laravel Directory to create controller. If you hate artisan then just create the StripePaymentController.php inside Controllers directory.
php artisan make:controller StripePaymentControllerYour StripePaymentController.php should look like this
<?php

namespace App\Http\Controllers;

use Illuminate\Http\Request;

class StripePaymentController extends Controller
{
    //
}
Now create a function to generate the PaymentIntent for the Stripe. Here you can note that the amount is multiplied by 100. Stripe API needs the amount in cents so we multiply the actual amount by 100.
public function paymentCreate(Request $request)
{
    try {
        \Stripe\Stripe::setApiKey(env('STRIPE_SECRET_KEY'));

        $paymentIntent = \Stripe\PaymentIntent::create([
            'amount' => 100 * 150, //150 USD.
            'currency' => 'usd',
            'automatic_payment_methods' => [
                'enabled' => true,
            ],
        ]);


        $output = [
            'clientSecret' => $paymentIntent->client_secret,
        ];

        return $output;
    } catch (\Exception $e) {
        dd($e);
    }
}
Create Routes for the Stripe Payment
We need two routes one with the GET method and the other with the POST method. GET method will be used to serve the Stripe Payment Form and POST method will be used to generate the clientSecret to process the payment. If you want you can create two other routes for the success and cancel situation but that’s optional. You can handle both statuses on the same page.
use \App\Http\Controllers\StripePaymentController;

Route::post('/stripe/createPayment', array(StripePaymentController::class, "paymentCreate"))->name("stripe-create-payment");
Route::get('/stripe/checkout', array(StripePaymentController::class, "checkout"))->name("stripe-checkout");
Route::get('/stripe/success', array(StripePaymentController::class, "success"))->name("stripe-success");
Route::get('/stripe/cancel', array(StripePaymentController::class, "cancel"))->name("stripe-cancel");
View for the Stripe Payment Form
Routes and Controller are ready, let’s move to the Payment Form.
@section('content')
<h1 style="text-align: center">Stripe Payment</h1>
<div class="row">
<div class="col-12">
<div class=" d-flex justify-content-center">
<div id="payment-message" class="hidden"></div>
<form id="payment-form">
<div id="payment-element">
<!--Stripe.js injects the Payment Element-->
</div>
<button id="submit">
<div class="spinner hidden" id="spinner"></div>
<span id="button-text">Pay now</span>
</button>
</form>
</div>
</div>
</div>
<script type="text/javascript">
// This is your test publishable API key.
const stripe = Stripe("{{env('STRIPE_PUBLISH_KEY')}}");
let elements;
initialize();
checkStatus();
document
.querySelector("#payment-form")
.addEventListener("submit", handleSubmit);
// Fetches a payment intent and captures the client secret
async function initialize() {
const { clientSecret } = await fetch("{{ route("stripe-create-payment") }}", {
method: "POST",
headers: { "Content-Type": "application/json" },
body: JSON.stringify({ _token: "{{csrf_token()}}"}),
}).then((r) => r.json());0
elements = stripe.elements({ clientSecret });
const paymentElementOptions = {
layout: "tabs"
};
const paymentElement = elements.create("payment", paymentElementOptions);
paymentElement.mount("#payment-element");
}
async function handleSubmit(e) {
e.preventDefault();
setLoading(true);
const { error } = await stripe.confirmPayment({
elements,
confirmParams: {
// Make sure to change this to your payment completion page
return_url: "{{ route("stripe-checkout") }}",
},
});
// This point will only be reached if there is an immediate error when
// confirming the payment. Otherwise, your customer will be redirected to
// your `return_url`. For some payment methods like iDEAL, your customer will
// be redirected to an intermediate site first to authorize the payment, then
// redirected to the `return_url`.
if (error.type === "card_error" || error.type === "validation_error") {
showMessage(error.message);
} else {
showMessage("An unexpected error occurred.");
}
setLoading(false);
}
// Fetches the payment intent status after payment submission
async function checkStatus() {
const clientSecret = new URLSearchParams(window.location.search).get(
"payment_intent_client_secret"
);
if (!clientSecret) {
return;
}
const { paymentIntent } = await stripe.retrievePaymentIntent(clientSecret);
switch (paymentIntent.status) {
case "succeeded":
showMessage("Payment succeeded!");
// you can redirect in case you want to display next page,
// window.location = "{{ route('stripe-success') }}";
break;
case "processing":
showMessage("Your payment is processing.");
break;
case "requires_payment_method":
showMessage("Your payment was not successful, please try again.");
break;
default:
showMessage("Something went wrong.");
break;
}
}
// ------- UI helpers -------
function showMessage(messageText) {
const messageContainer = document.querySelector("#payment-message");
messageContainer.classList.remove("hidden");
messageContainer.textContent = messageText;
setTimeout(function () {
messageContainer.classList.add("hidden");
messageText.textContent = "";
}, 4000);
}
// Show a spinner on payment submission
function setLoading(isLoading) {
if (isLoading) {
// Disable the button and show a spinner
document.querySelector("#submit").disabled = true;
document.querySelector("#spinner").classList.remove("hidden");
document.querySelector("#button-text").classList.add("hidden");
} else {
document.querySelector("#submit").disabled = false;
document.querySelector("#spinner").classList.add("hidden");
document.querySelector("#button-text").classList.remove("hidden");
}
}
</script>
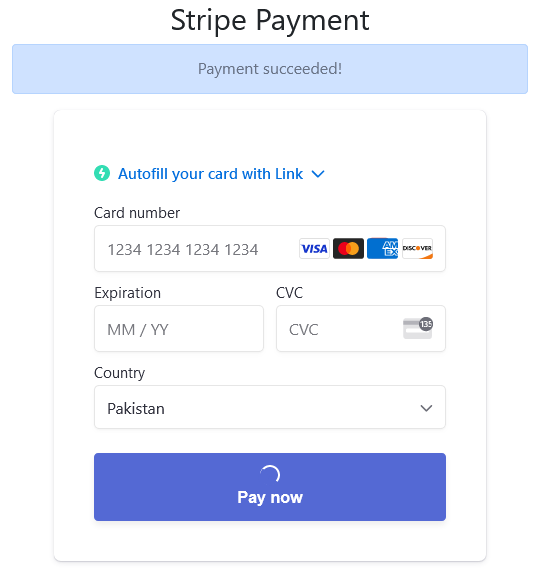
@endsectionThat’s how your form should look like if you visit the following URL.
http://<Your-APP-URL>/stripe/checkout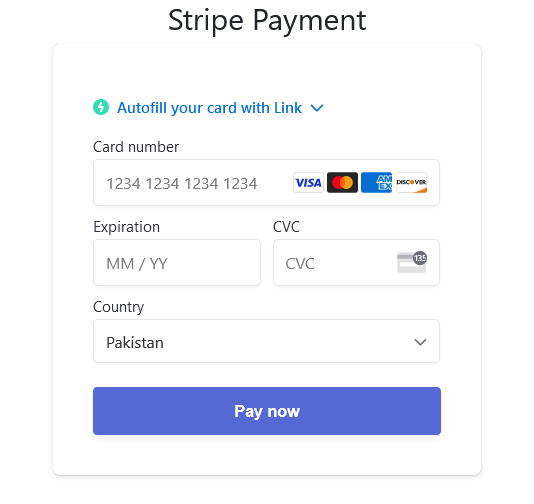
I have used the following CSS to make it look like this. You can copy that in to your project if you want to.
/* Variables */

form {
    width: 30vw;
    min-width: 500px;
    align-self: center;
    box-shadow: 0px 0px 0px 0.5px rgba(50, 50, 93, 0.1),
    0px 2px 5px 0px rgba(50, 50, 93, 0.1), 0px 1px 1.5px 0px rgba(0, 0, 0, 0.07);
    border-radius: 7px;
    padding: 40px;
}

.hidden {
    display: none;
}

#payment-message {
    color: rgb(105, 115, 134);
    font-size: 16px;
    line-height: 20px;
    padding-top: 12px;
    text-align: center;
}

#payment-element {
    margin-bottom: 24px;
}

/* Buttons and links */
button {
    background: #5469d4;
    font-family: Arial, sans-serif;
    color: #ffffff;
    border-radius: 4px;
    border: 0;
    padding: 12px 16px;
    font-size: 16px;
    font-weight: 600;
    cursor: pointer;
    display: block;
    transition: all 0.2s ease;
    box-shadow: 0px 4px 5.5px 0px rgba(0, 0, 0, 0.07);
    width: 100%;
}
button:hover {
    filter: contrast(115%);
}
button:disabled {
    opacity: 0.5;
    cursor: default;
}

/* spinner/processing state, errors */
.spinner,
.spinner:before,
.spinner:after {
    border-radius: 50%;
}
.spinner {
    color: #ffffff;
    font-size: 22px;
    text-indent: -99999px;
    margin: 0px auto;
    position: relative;
    width: 20px;
    height: 20px;
    box-shadow: inset 0 0 0 2px;
    -webkit-transform: translateZ(0);
    -ms-transform: translateZ(0);
    transform: translateZ(0);
}
.spinner:before,
.spinner:after {
    position: absolute;
    content: "";
}
.spinner:before {
    width: 10.4px;
    height: 20.4px;
    background: #5469d4;
    border-radius: 20.4px 0 0 20.4px;
    top: -0.2px;
    left: -0.2px;
    -webkit-transform-origin: 10.4px 10.2px;
    transform-origin: 10.4px 10.2px;
    -webkit-animation: loading 2s infinite ease 1.5s;
    animation: loading 2s infinite ease 1.5s;
}
.spinner:after {
    width: 10.4px;
    height: 10.2px;
    background: #5469d4;
    border-radius: 0 10.2px 10.2px 0;
    top: -0.1px;
    left: 10.2px;
    -webkit-transform-origin: 0px 10.2px;
    transform-origin: 0px 10.2px;
    -webkit-animation: loading 2s infinite ease;
    animation: loading 2s infinite ease;
}

@-webkit-keyframes loading {
    0% {
        -webkit-transform: rotate(0deg);
        transform: rotate(0deg);
    }
    100% {
        -webkit-transform: rotate(360deg);
        transform: rotate(360deg);
    }
}
@keyframes loading {
    0% {
        -webkit-transform: rotate(0deg);
        transform: rotate(0deg);
    }
    100% {
        -webkit-transform: rotate(360deg);
        transform: rotate(360deg);
    }
}

@media only screen and (max-width: 600px) {
    form {
        width: 80vw;
        min-width: initial;
    }
}
Testing Stripe Payment Integration in Laravel
You can use any of these testing card to make the payments.
| Number | Brand | CVC | Date |
|---|---|---|---|
| 4242 4242 4242 4242 | Visa | Any 3 digits | Any future date |
| 4000 0566 5566 5556 | Visa (debit) | Any 3 digits | Any future date |
| 5555 5555 5555 4444 | Mastercard | Any 3 digits | Any future date |
| 2223 0031 2200 3222 | Mastercard (2-series) | Any 3 digits | Any future date |
| 5200 8282 8282 8210 | Mastercard (debit) | Any 3 digits | Any future date |
| 5105 1051 0510 5100 | Mastercard (prepaid) | Any 3 digits | Any future date |
| 3782 8224 6310 005 | American Express | Any 4 digits | Any future date |
| 3714 4963 5398 431 | American Express | Any 4 digits | Any future date |
| 6011 1111 1111 1117 | Discover | Any 3 digits | Any future date |
| 6011 0009 9013 9424 | Discover | Any 3 digits | Any future date |
| 3056 9300 0902 0004 | Diners Club | Any 3 digits | Any future date |
| 3622 7206 2716 67 | Diners Club (14 digit card) | Any 3 digits | Any future date |
| 3566 0020 2036 0505 | JCB | Any 3 digits | Any future date |
| 6200 0000 0000 0005 | UnionPay | Any 3 digits | Any future date |
Other Payment Methods using Stripe
There are some other methods like Wallets/Bank Redirects/Bank Transfer to make the payment. I have covered the Google Pay payment method in my other article. Let me know which payments methods you want to see in future in comments, I will create the tutorials for those payments methods.
Conclusion / Final Thoughts
This article provides a tutorial on how to integrate Stripe, a popular payment processing platform, into a Laravel application. It begins by explaining how to set up and install Laravel, and then goes on to describe how to install the Stripe PHP library and obtain API keys for the Stripe account.
It also covers how to set up a form and use Stripe Elements to collect payment information, as well as how to confirm the payment and handle errors. Finally, the article explains how to use Laravel’s built-in ecosystem to handle the successful payment response from Stripe.
Feel free to ask question or share this article with you friends and colleagues.